いろいろやろうと思ってて、やってなかった事。
去年ベータ的にできたらしいのだが、改めてやってみた、IPアドレスのLet’s Encrypt証明書。

じゃなくて

IPアドレスの直打ちURLなのに鍵がかかっているやつ。
これも、「どこに書いてあったんですか?」「誰が言ったんですか?」「サポートされますか?」勢は手を出さないほうがいい。
特に最後の「サポートされますか?」は、ベンダーに聞いてくれよ、ほんとに(汗)
今回、調査と手順を全部書いたから長文
ところで、誰がこれを使うの?
今や、FLET’SやNUROなどでは、追加のIPv4アドレスを契約しなくてもGlobal IPv6を利用できる環境が多い。だったら、IPアドレスのLet’s Encrypt証明書も使い出があるのではないか。……と思って調べてみると、
完全に逸般の誤家庭
でしかユースケースがない。
ホームラボで考えてみる
外部からアクセスできるパブリックIPv4アドレスを複数持っているホームラボはかなりレアで、持っていたとしても、そんなにたくさんのIPv4アドレスを持っているわけではない。一方、IPv6はFLET’SやNUROなどでGlobal IPv6を利用でき、さらに宅内のデバイス自身がGlobal IPv6アドレスを持つ構成も可能である。だったら、これは使えるのではないか。……と思ったのだが、ここで問題になる。
そもそも普通の家庭用ルーターで、IPv6 Firewallを細かく設定できるものがどれだけあるのか?
IPv6 Firewallを全体でON/OFFする程度しかできないものもある。あるいは、WANにハブをつけてWANのケーブルを分岐させて、分岐させたもう一つWANの線をLAN側にも挿すという力技をやれば通信できるかもしれないが、それでは宅内のデバイスをまとめて外部へ公開するような話になりかねない。
つまり、
PC —-IPv6—-> Internet
ができることと、
Internet —-IPv6—-> 自宅サーバー
ができることは、まったく別の話である。
少なくとも、
ISPからIPv6 prefixを受け取る
|
v
LANへIPv6 prefixを配布
|
v
宅内サーバーがGlobal IPv6を持つ
|
v
NDP / ICMPv6等が正常に動作
|
v
IPv6 routing
|
v
Stateful IPv6 Firewall
|
v
特定のGlobal IPv6だけ
TCP/80,443をWANから許可
|
v
Internetから宅内サーバーへ到達
という環境が必要になる。
IPv4でよくある、
192.168.1.100:443をポート開放
とは少し世界が違う。
今回の環境では、NATやDNATを行っていない。
Ubuntuコンテナ自身がGlobal IPv6アドレスを持っており、EdgeRouterでは、そのIPv6アドレスに対するTCP/80とTCP/443をIPv6 Firewallで許可しているだけである。
Internet
|
| IPv6
v
EdgeRouter
|
| WANv6_IN
| destination = UbuntuのGlobal IPv6
| TCP 80,443 ACCEPT
v
Ubuntu 26.04
|
+– nginx
+– acme.sh
かなり素直なIPv6 end-to-end通信である。
なので、この時点で逸般の誤家庭でしかない。。。
クラウド環境で考えてみる
ではクラウドならどうか。
クラウド環境ではDNSを使うハードルが低いので、わざわざIPアドレスベースの証明書を使う必要があまりない。IPアドレス証明書を使うためだけにIPv6前提でVPCやインスタンスを構築する理由も薄い。
普通にDNS名を付けて、そのDNS名に対して証明書を発行すればよい。
このユースケースを考えていくと、
IPv6化されていて、Global IPv6を持つサーバーを外部へ直接公開でき、さらにFirewallをIPv6アドレス単位で制御できるホームラボ
あたりしか思い浮かばない。
IPv6では各ホストがGlobal IPv6アドレスを持ち、NATで隠すのではなくFirewallで制御する。今回の検証環境は、まさにその構成になっている。
IPアドレスのLet’s Encrypt証明書のユースケース
では、実際に何がうれしいのか。DNSという依存関係を消せる代わりに、IPアドレスそのものがIdentityになる。
メリット
-
DNSなしで使える
-
DNSへ登録せず、そのままHTTPS化できる。管理画面、API、監視エンドポイントなどをIP直指定のままTLS化できる。
-
証明書のためだけにドメインを取得・維持する必要がなく、ドメイン自体の更新管理も不要になる。
-
使い捨てでHTTPS
-
有効期限が約1週間(160時間)しかないので、更新しなければ証明書を使い捨てることができる。
-
「IP直アクセスだから
-k」をやめられる -
セキュリティ面ではかなり重要である。従来、管理系APIなどでありがちだった、
curl -k
をやめられる。
デメリット
-
ホスト名としてIPv6直打ちは無理ゲー
-
人間が毎回、https://[2001:db8:1234:5678::100]/のようなURLを入力して使うものではない。基本的には自動化の一環として使うことになる。
-
有効期限が約1週間(160時間)しかないので、手動更新も無理ゲー
-
更新の自動化が必須になる。
-
IPアドレスが変われば証明書も取り直し
-
普段それほど頻繁に変わるものでもないが、ISPから委譲されるIPv6 prefixが変わったら事件である。
-
ISPを変更してIPv6 prefixが変わった場合、その旧IPv6アドレスに対して発行した証明書は使えなくなるため、対象となる証明書はすべて再取得が必要になる。
要するに、大手SIerのエンジニアが言い出すことがある、
「有効期限を100年にしてください」
「example.comのHTTPS証明書をLet’s Encryptで」
と言っているような人は使えない。
そんな代物だと思う。
そもそも、Let’s Encryptの証明書があっても、そのサーバーや運営者が安全だと証明しているわけではない。所定のACME Challengeによって、そのDNS名やIPアドレスに対する制御を確認した上で証明書を発行しているだけである。
証明書が証明しているのは、「このサーバーは安全です」ということではない。
証明書を長寿命化するのではなく、更新作業そのものをなくす
昔からシステム導入では、証明書更新という運用作業を嫌って、自己署名証明書の有効期限を極端に長くする構成を見かけることがある。しかし、証明書を長寿命化することと、証明書更新を自動化することは、まったく違うアプローチである。
short-lived Certificateは、その逆である。
「更新しなくて済むように証明書を長くする」
のではなく、
「人間が更新しなくて済むように自動化する」
ことで、証明書自体は短命にする。
自動更新のために独自ツールを作る必要もない。ACMEという標準プロトコルがあり、Certbotやacme.shのような実装もある。更新作業を避けるために証明書を長寿命化するより、標準化された仕組みを使って、更新作業そのものを人間の仕事からなくす方が自然である。
それでもIPアドレス証明書は面白い
実用性だけを考えれば、一般的なWebサービスでは今後もFQDNを使う方が便利だろう。
しかし、
VM / Containerを自動生成
|
v
Global IPv6取得
|
v
DNS登録なし
|
v
IP Address Certificate取得
|
v
HTTPSサービス起動
という構成が可能になったこと自体は興味深い。
一時的な検証環境、管理API、Webhook、監視エンドポイント、DNSに依存したくない管理経路などでは、使い道も考えられる。そして今回実際に試してみて、もう一つ面白かったのは、TLS証明書が**「何を証明しているのか」**が非常に分かりやすくなったことである。
DNS証明書
DNS:server.example.com
|
+– server.example.com を検証する
IPアドレス証明書
IP Address:2001:db8:1234:5678::100
|
+– 2001:db8:1234:5678::100 を検証する
DNS名の証明書だからといって、その名前から解決されたIPアドレスまで証明されるわけではない。逆に、IPv6アドレスに発行した今回の証明書だからといって、同じサーバーのFQDNやIPv4アドレスまで証明されるわけでもない。
証明されるのは、証明書のSANに記載されたIdentifierである。
今回の検証は、
「IPv6アドレスそのものにLet’s Encrypt証明書を発行できるのか」
という単純な興味から始めた。
実際にやってみると、
IPv6 end-to-end connectivity
+
IPv6 Firewall
+
ACME HTTP-01
+
IP Address SAN
+
short-lived certificate
+
自動更新
まで一通り確認することになった。
で、結局誰が使うのか。
IPv6をend-to-endで通して
|
Global IPv6を持つコンテナを作って
|
IPv6 Firewallをアドレス単位で制御して
|
ACMEでIPアドレス証明書を取得して
|
160時間の証明書を自動更新して遊ぶ人
……やっぱり逸般の誤家庭だった。
それにしても
「100年証明書を欲しがる人に160時間証明書を持っていったらどうなるか」
と考えると面白い。
誰が使うのかはさておき、IPv6とTLSの仕組みを確認する検証としては、なかなか面白い題材であった。
では、本題の手順へ
掲載している
2001:db8::/32 は文書用アドレスであり、実際にはLet’s Encryptから証明書を取得できない。コマンド出力中のIPアドレスも実機結果から文書用アドレスへ置換している。実際に検証する場合は、必ず自身に割り当てられたGlobal IPv6アドレスへ読み替えてください。
1. 自分環境でのUbuntu 26.04の事前準備
外部からIPv6で接続できるインスタンスを作成し、nginxをインストールする。
外部からの接続確認はOracle Cloud上のVMから行っているが、スマートフォンやテザリング環境から確認してもよい。ただし、テザリングを利用する場合は、接続した端末からIPv6でInternetへ接続できることを事前に確認する。
言うまでもないが、ラボ内でGlobal IPv6アドレスを利用できることが大前提となる。
Incusでインスタンスを作成
自分の場合は、Incusを使うとUbuntu 26.04 Serverのインスタンスを瞬殺で作成できるので、Incusを利用する。
incus launch images:ubuntu/26.04/cloud le-ipv6-test -p default -p br0
incus list
incus exec le-ipv6-test bash
IPv6アドレスとルーティングを確認する。
ip -6 addr show
ip -6 route
外向きのIPv6疎通を確認する。(Cloudflare の Public DNS、1.1.1.1 の IPv6 )
ping -6 -c 3 2606:4700:4700::1111
nginxをインストール
apt update
apt -y upgrade
apt -y install nginx
nginx -v
今回の環境では以下となった。
nginx version: nginx/1.28.3 (Ubuntu)
テストページを作成する。
後でHTTPとHTTPSの違いを確認できるように、nginxのSSI(Server Side Includes)を有効にし、接続情報を表示するテストページを作成します。
SSIを利用することで、nginxが持っている接続時の情報をHTMLへ埋め込んで表示できます。
cat <<‘EOF’ > /etc/nginx/sites-available/default
server {
listen 80 default_server;
listen [::]:80 default_server;
root /var/www/html;
index index.shtml index.html;
server_name _;
location / {
ssi on;
try_files $uri $uri/ =404;
}
}
EOF
cat <<‘EOF’ > /var/www/html/index.shtml
<!doctype html>
<html>
<head>
<meta charset=”utf-8″>
<title>Let’s Encrypt IPv6 IP Certificate Test</title>
</head>
<body>
<h1>Let’s Encrypt IPv6 IP Certificate Test</h1>
<h2>Connection Information</h2>
<pre>
Protocol : <!–# echo var=”scheme” –>
Server Address : <!–# echo var=”server_addr” –>
Server Port : <!–# echo var=”server_port” –>
TLS Protocol : <!–# echo var=”ssl_protocol” –>
TLS Cipher : <!–# echo var=”ssl_cipher” –>
</pre>
<h2>Client Information</h2>
<pre>
Client Address : <!–# echo var=”remote_addr” –>
User Agent : <!–# echo var=”http_user_agent” –>
</pre>
</body>
</html>
EOF
nginx -t
systemctl reload nginx
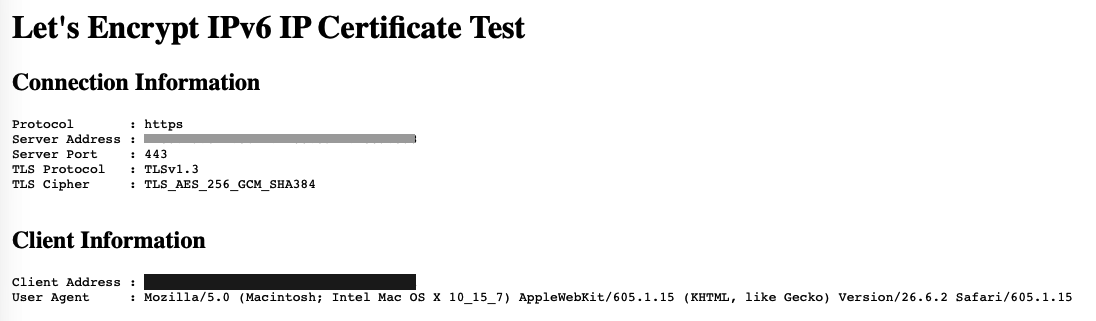
この時点ではHTTP接続なので、Protocolは
http、Server Portは80となり、TLS ProtocolおよびTLS Cipherには有効なTLS接続情報は表示されません。Connection Information
Protocol : http
Server Address : 2001:db8:1234:5678::100
Server Port : 80
TLS Protocol : (none)
TLS Cipher : (none)
Client Information
Client Address : 2001:db8:abcd:ef01::200
User Agent : Mozilla/5.0 (Macintosh; Intel Mac OS X 10_15_7) AppleWebKit/605.1.15 (KHTML, like Gecko) Version/26.6.2 Safari/605.1.15
後で証明書を設定してHTTPSでアクセスすると、同じページで、
Connection Information
Protocol : https
Server Address : 2001:db8:1234:5678::100
Server Port : 443
TLS Protocol : TLSv1.3
TLS Cipher : TLS_AES_256_GCM_SHA384
Client Information
Client Address : 2001:db8:abcd:ef01::200
User Agent : Mozilla/5.0 (Macintosh; Intel Mac OS X 10_15_7) AppleWebKit/605.1.15 (KHTML, like Gecko) Version/26.6.2 Safari/605.1.15
nginxがIPv6 TCP/80でLISTENしていることを確認する。
ss -lntp | grep ‘:80’
[::]:80 があればOK。2. EdgeRouterの設定
他のルーターを利用している場合も、同様に対象IPv6アドレスへの通信だけを許可する。
ファイアウォールがIPv6 LAN全体のON/OFFしか設定できず、特定のIPv6アドレス単位で制御できない場合は、この検証は中止した方がよい。
IPv6ではLAN内の各デバイスがGlobal IPv6アドレスを持つ構成が一般的であり、IPv4 NATを境界防御として期待できない。そのため、WAN側IPv6 Firewallを一括で無効化するのではなく、今回使用するIPv6アドレスと必要なポートだけを明示的に許可する。
このあたりが、いわゆる「逸般の誤家庭」環境が必要になる所以でもある。
今回の構成は以下。
Internet
|
| IPv6
| TCP/80 : ACME HTTP-01
| TCP/443 : HTTPS test
v
EdgeRouter (Firewall)
|
v
Ubuntu 26.04
2001:db8:1234:5678::100
|
v
nginx :80
NATは一切利用しない。
対象コンテナのGlobal IPv6アドレスへのTCP/80、TCP/443をEdgeRouterのIPv6 Firewallで許可する。
set firewall ipv6-name WANv6_IN rule 15 action accept
set firewall ipv6-name WANv6_IN rule 15 description ‘LetsEncrypt IPv6 ACME Test’
set firewall ipv6-name WANv6_IN rule 15 destination address ‘2001:db8:1234:5678::100’
set firewall ipv6-name WANv6_IN rule 15 destination port 80,443
set firewall ipv6-name WANv6_IN rule 15 protocol tcp
Internet側IPv6環境から確認
curl -6 -v \
‘http://[2001:db8:1234:5678::100]/’
nginxからHTTP応答が返ればOK。
ブラウザで確認する場合は
http://[2001:db8:1234:5678::100]
をURLに指定する。
ACME Challenge用のパスも確認する。
mkdir -p /var/www/html/.well-known/acme-challenge
echo ‘ACME IPv6 OK’ \
> /var/www/html/.well-known/acme-challenge/test
外部IPv6環境から確認する。
curl -6 \
‘http://[2001:db8:1234:5678::100]/.well-known/acme-challenge/test’
以下が返ればOK。
ACME IPv6 OK
以降の手順では、このIPv6アドレスに対して外部からHTTP-01 Challengeを実行できる状態を前提とする。
3. どのツールでIPv6アドレスのLet’s Encrypt証明書を取得できるか確認
以下はツールの調査なので、実際に証明書を作成するだけなら実行する必要はない。
Let’s EncryptのIPアドレス証明書は、
shortlived Profileを使用した短期証明書として発行され、有効期間は160時間(6日16時間)となる。Short-Lived Certificateは、証明書の有効期間を意図的に短くする仕組みである。例えば秘密鍵の漏洩などの問題が発生した場合でも、その証明書を更新しなければ短期間で期限切れになる。
従来の長期間有効な証明書では、問題発生時にCRLなどの失効処理への依存度が高くなる。Short-Lived Certificateでは、短い有効期間と頻繁な自動更新を組み合わせることで、証明書失効の仕組みへの依存を減らすことができる。
IPアドレス証明書を取得するACMEクライアントの条件
IPアドレスのLet’s Encrypt証明書を取得するCertbotやacme.shなどのACMEクライアントには、以下の両方が必要となる。
-
IPアドレスを証明書のIdentifierとして指定できること
-
shortlivedCertificate Profileを利用できること
Ubuntu 26.04で候補となるのは以下の3種類。
-
APT版Certbot
-
Snap版Certbot
-
APT版acme.sh
どれでIPアドレス証明書を取得できるか調べる。
3.1 APT版Certbot
インストール
apt-cache policy certbot
今回のUbuntu 26.04では以下となった。
certbot:
Installed: (none)
Candidate: 4.0.0-4
Version table:
4.0.0-4 500
500 http://archive.ubuntu.com/ubuntu resolute/universe amd64 Packages
インストールする。
apt install -y certbot
IPアドレス証明書への対応確認
certbot –help all | grep -E — ‘–ip-address|preferred-profile’
結果:
–preferred-profile PREFERRED_PROFILE
--preferred-profile は存在するが、--ip-address は存在しない。Certificate Profileの指定機能も確認する。
certbot –help all | grep -A3 -B3 — ‘preferred-profile’
allows fallback to a default. Use this setting when
renewal failure is preferable to fallback. (default:
None)
–preferred-profile PREFERRED_PROFILE
Request the given profile name from the ACME server,
or fallback to default. If the given profile name
exists in the ACME directory, use it to request a a
APT版Certbot 4.0.0はCertificate Profileには対応しているが、IP address identifierを指定するCLIが実装されていない。
したがって、IPアドレス証明書の取得には使用できない。
アンインストール
apt -y remove certbot
apt -y autoremove
3.2 Snap版Certbot
インストール
apt -y install snapd
snap install certbot –classic
/snap/bin/certbot –version
今回の環境では以下となった。
certbot 5.7.0
IPアドレス証明書への対応確認
/snap/bin/certbot –help all | grep -A3 -B3 — ‘–ip-address’
–ip-address IP_ADDRESSES
IP addresses to include. For multiple IP addresses you
can use multiple –ip-address flags. All IP addresses
will be included as Subject Alternative Names on the
certificate. (default: [])
Certificate Profileも確認する。
/snap/bin/certbot –help all | grep -A3 -B3 — ‘–preferred-profile’
–preferred-profile PREFERRED_PROFILE
Request the given profile name from the ACME server,
or fallback to default. If the given profile name
exists in the ACME directory, use it to request a a
Snap版Certbot 5.7.0では、
-
--ip-address -
--preferred-profile
の両方が利用できる。
Certbotでは5.3.0から
--ip-addressが追加された。ただし、今回使用するwebrootによるIPアドレス証明書の取得には5.4.0以降が必要となる。3.3 APT版acme.sh
インストール
apt-cache policy acme.sh
今回の環境では以下となった。
acme.sh:
Installed: 3.1.2+~cs0.0.20251126-2
Candidate: 3.1.2+~cs0.0.20251126-2
Version table:
*** 3.1.2+~cs0.0.20251126-2 500
500 http://archive.ubuntu.com/ubuntu resolute/universe amd64 Packages
100 /var/lib/dpkg/status
インストールする。
apt install -y acme.sh
acme.sh –version
v3.1.2
Certificate Profile対応確認
acme.sh –help | grep -i -A2 profile
–cert-profile, –certificate-profile <profile> If the CA offers profiles, select the desired profile
See: https://github.com/acmesh-official/acme.sh/wiki/Profile-selection
--certificate-profile が実装されているため、Let’s Encryptが提供するshortlived Profileを指定できる。IP identifier対応確認
grep -nE ‘ID_TYPE_IP|identifier.*ip|type.*ip’ \
“$(command -v acme.sh)” | head -30
64:ID_TYPE_IP=”ip”
4372: echo “$ID_TYPE_IP”
acme.sh 3.1.2にはIPアドレスをACME identifierの
ip typeとして扱う実装が存在する。調査結果
|
Ubuntu 26.04での導入方法
|
Version
|
IP identifier
|
shortlived |
webrootでIP証明書
|
|---|---|---|---|---|
|
APT Certbot
|
4.0.0
|
×
|
○
|
×
|
|
Snap Certbot
|
5.7.0
|
○
|
○
|
○
|
|
APT acme.sh
|
3.1.2
|
○
|
○
|
○ ※後述で実証
|
Ubuntu 26.04標準APT版Certbot 4.0.0ではIPアドレス証明書を取得できない。
Snap版Certbot 5.7.0、またはAPT版acme.sh 3.1.2を使用する。
4. 実際の手順
以降は、前章で確認したGlobal IPv6アドレスを使用する。
2001:db8:1234:5678::100
各自の環境では、対象となるIPv6アドレスに読み替える。
手順の中に出てくるIPv6アドレスはこのアドレスだけなので、置換をすれば、自分用のドキュメントになるはずである。
証明書はいきなりProduction環境で取得せず、まずStagingで取得できることを確認する。
Stagingとは
StagingとはLet’s Encryptのテスト環境で、証明書の取得手順やACME Challengeの動作確認に使用するもの。
ProductionにもStagingにもRate Limitは存在するが、StagingはProductionより大幅に緩く設定されている。
そのため、設定を試行錯誤する場合は、まずStagingで証明書を取得できることを確認してからProductionで本番証明書を取得する。
また、Stagingが発行する証明書は公開Trust Storeから信頼されていないテストCAによる証明書なので、ブラウザでアクセスすると証明書エラーになる。これは仕様である。
5. Snap版Certbotを利用する場合
IPアドレス証明書では、現時点でCertbotの
--nginx installerは利用できない。そのため、以下の構成とする。
webrootで証明書取得
↓
nginxへ手動設定
↓
Certbot標準の自動renew
↓
deploy hook
↓
nginx reload
5.1 Snap版Certbotをインストール
Ubuntu 26.04 Cloud Imageにはsnapdがインストールされていないため、最初にsnapdをインストールする。
apt update
apt install -y snapd
Snap版Certbotをインストールする。
snap install certbot –classic
/snap/bin/certbot –version
certbot 5.7.0
通常の
certbotコマンドとして使用できるようにする。ln -s /snap/bin/certbot /usr/local/bin/certbot
確認する。
certbot –version
5.2 Let’s Encrypt Stagingで取得
certbot certonly \
–staging \
–preferred-profile shortlived \
–webroot \
–webroot-path /var/www/html \
–ip-address ‘2001:db8:1234:5678::100’
初回はメールアドレスや利用規約について質問されるので回答する。
Saving debug log to /var/log/letsencrypt/letsencrypt.log
Enter email address or hit Enter to skip.
(Enter ‘c’ to cancel): hogehoge@example.com
– – – – – – – – – – – – – – – – – – – – – – – – – – – – – – – – – – – – – – – –
Please read the Terms of Service at:
https://letsencrypt.org/documents/LE-SA-v1.8-July-06-2026.pdf
You must agree in order to register with the ACME server. Do you agree?
– – – – – – – – – – – – – – – – – – – – – – – – – – – – – – – – – – – – – – – –
(Y)es/(N)o: yes
– – – – – – – – – – – – – – – – – – – – – – – – – – – – – – – – – – – – – – – –
Would you be willing, once your first certificate is successfully issued, to
share your email address with the Electronic Frontier Foundation, a founding
partner of the Let’s Encrypt project and the non-profit organization that
develops Certbot? We’d like to send you email about our work encrypting the web,
EFF news, campaigns, and ways to support digital freedom.
– – – – – – – – – – – – – – – – – – – – – – – – – – – – – – – – – – – – – – – –
(Y)es/(N)o: yes
Account registered.
Requesting a certificate for 2001:db8:1234:5678::100
Successfully received certificate.
Certificate is saved at: /etc/letsencrypt/live/2001:db8:1234:5678::100/fullchain.pem
Key is saved at: /etc/letsencrypt/live/2001:db8:1234:5678::100/privkey.pem
This certificate expires on 2026-08-28.
These files will be updated when the certificate renews.
Certbot has set up a scheduled task to automatically renew this certificate in the background.
成功後、証明書を確認する。
certbot certificates
Saving debug log to /var/log/letsencrypt/letsencrypt.log
– – – – – – – – – – – – – – – – – – – – – – – – – – – – – – – – – – – – – – – –
Found the following certs:
Certificate Name: 2001:db8:1234:5678::100
Serial Number: 2c675dd854965c3cdab257cda43d117f8a2c
Key Type: ECDSA
Identifiers: 2001:db8:1234:5678::100
Expiry Date: 2026-08-28 18:35:22+00:00 (INVALID: TEST_CERT)
Certificate Path: /etc/letsencrypt/live/2001:db8:1234:5678::100/fullchain.pem
Private Key Path: /etc/letsencrypt/live/2001:db8:1234:5678::100/privkey.pem
– – – – – – – – – – – – – – – – – – – – – – – – – – – – – – – – – – – – – – – –
証明書は以下に作成される。
/etc/letsencrypt/live/2001:db8:1234:5678::100/
ls -la \
‘/etc/letsencrypt/live/2001:db8:1234:5678::100/’
主なファイル:
-rw-r–r– 1 root root 692 Aug 22 03:33 README
lrwxrwxrwx 1 root root 59 Aug 22 03:33 cert.pem -> ../../archive/2001:db8:1234:5678::100/cert1.pem
lrwxrwxrwx 1 root root 60 Aug 22 03:33 chain.pem -> ../../archive/2001:db8:1234:5678::100/chain1.pem
lrwxrwxrwx 1 root root 64 Aug 22 03:33 fullchain.pem -> ../../archive/2001:db8:1234:5678::100/fullchain1.pem
lrwxrwxrwx 1 root root 62 Aug 22 03:33 privkey.pem -> ../../archive/2001:db8:1234:5678::100/privkey1.pem
証明書の内容を確認する。
openssl x509 \
-in ‘/etc/letsencrypt/live/2001:db8:1234:5678::100/cert.pem’ \
-noout \
-issuer \
-dates \
-ext subjectAltName
例えば以下のようになれば成功。
issuer=C=US, O=Let’s Encrypt, CN=(STAGING) Artificial Amaranth YE1
notBefore=Aug 22 02:35:23 2026 GMT
notAfter=Aug 28 18:35:22 2026 GMT
X509v3 Subject Alternative Name: critical
IP Address:2001:db8:1234:5678::100
重要なのは、
DNS:example.com
ではなく、
IP Address:2001:…
となっていること。
5.3 Let’s Encrypt Production証明書を取得
Stagingで問題ないことを確認したらProductionへ切り替える。
--stagingを外して実行する。certbot certonly \
–preferred-profile shortlived \
–webroot \
–webroot-path /var/www/html \
–ip-address ‘2001:db8:1234:5678::100’
以下は
What would you like to do?
– – – – – – – – – – – – – – – – – – – – – – – – – – – – – – – – – – – – – – – –
1: Keep the existing certificate for now
2: Renew & replace the certificate (may be subject to CA rate limits)
2を選択
Saving debug log to /var/log/letsencrypt/letsencrypt.log
Enter email address or hit Enter to skip.
(Enter ‘c’ to cancel): hogehoge@example.com
– – – – – – – – – – – – – – – – – – – – – – – – – – – – – – – – – – – – – – – –
Please read the Terms of Service at:
https://letsencrypt.org/documents/LE-SA-v1.8-July-06-2026.pdf
You must agree in order to register with the ACME server. Do you agree?
– – – – – – – – – – – – – – – – – – – – – – – – – – – – – – – – – – – – – – – –
(Y)es/(N)o: yes
– – – – – – – – – – – – – – – – – – – – – – – – – – – – – – – – – – – – – – – –
Would you be willing, once your first certificate is successfully issued, to
share your email address with the Electronic Frontier Foundation, a founding
partner of the Let’s Encrypt project and the non-profit organization that
develops Certbot? We’d like to send you email about our work encrypting the web,
EFF news, campaigns, and ways to support digital freedom.
– – – – – – – – – – – – – – – – – – – – – – – – – – – – – – – – – – – – – – – –
(Y)es/(N)o: yes
Account registered.
Certificate not yet due for renewal
You have an existing certificate that has exactly the same domains or certificate name you requested and isn’t close to expiry.
(ref: /etc/letsencrypt/renewal/2001:db8:1234:5678::100.conf)
What would you like to do?
– – – – – – – – – – – – – – – – – – – – – – – – – – – – – – – – – – – – – – – –
1: Keep the existing certificate for now
2: Renew & replace the certificate (may be subject to CA rate limits)
– – – – – – – – – – – – – – – – – – – – – – – – – – – – – – – – – – – – – – – –
Select the appropriate number [1-2] then [enter] (press ‘c’ to cancel): 2
Renewing an existing certificate for 2001:db8:1234:5678::100
Successfully received certificate.
Certificate is saved at: /etc/letsencrypt/live/2001:db8:1234:5678::100/fullchain.pem
Key is saved at: /etc/letsencrypt/live/2001:db8:1234:5678::100/privkey.pem
This certificate expires on 2026-08-28.
These files will be updated when the certificate renews.
Certbot has set up a scheduled task to automatically renew this certificate in the background.
– – – – – – – – – – – – – – – – – – – – – – – – – – – – – – – – – – – – – – – –
If you like Certbot, please consider supporting our work by:
* Donating to ISRG / Let’s Encrypt: https://letsencrypt.org/donate
* Donating to EFF: https://eff.org/donate-le
– – – – – – – – – – – – – – – – – – – – – – – – – – – – – – – – – – – – – – – –
root@le-ipv6-test-certbot:~#
Production証明書取得後、内容を確認する。
openssl x509 \
-in ‘/etc/letsencrypt/live/2001:db8:1234:5678::100/cert.pem’ \
-noout \
-issuer \
-dates \
-ext subjectAltName
Let’s Encryptの
shortlived ProfileによるIPアドレス証明書の有効期間は160時間。issuer=C=US, O=Let’s Encrypt, CN=YE2
notBefore=Aug 22 02:39:10 2026 GMT
notAfter=Aug 28 18:39:09 2026 GMT
X509v3 Subject Alternative Name: critical
IP Address:2001:db8:1234:5678::100
5.4 nginxから証明書を参照
Certbotでは、
/etc/letsencrypt/live/<IP address>/
に実運用向けのsymlinkが用意される。
そのため、acme.shのように別ディレクトリへコピーする必要はない。
nginxから直接以下を参照する。
/etc/letsencrypt/live/2001:…/fullchain.pem
/etc/letsencrypt/live/2001:…/privkey.pem
5.5 nginx HTTPS設定
/etc/nginx/sites-available/defaultなどに443用serverを設定する。cat <<‘EOF’ >> /etc/nginx/sites-available/default
server {
listen 443 ssl;
listen [::]:443 ssl;
ssl_certificate /etc/letsencrypt/live/2001:db8:1234:5678::100/fullchain.pem;
ssl_certificate_key /etc/letsencrypt/live/2001:db8:1234:5678::100/privkey.pem;
root /var/www/html;
index index.shtml index.html;
location / {
ssi on;
try_files $uri $uri/ =404;
}
}
EOF
確認する。
nginx -t
systemctl reload nginx
443の待受も確認する。
ss -lntp | grep ‘:443’
5.6 HTTPS確認
外部IPv6環境から確認する。
curl -6 -v \
‘https://[2001:db8:1234:5678::100]/’
証明書検証が成功し、IPv6アドレスとSANが一致していることを確認する。
* Trying [2001:db8:1234:5678::100]:443…
* Connected to 2001:db8:1234:5678::100 (2001:db8:1234:5678::100) port 443
* ALPN: curl offers h2,http/1.1
* TLSv1.3 (OUT), TLS handshake, Client hello (1):
* CAfile: /etc/ssl/certs/ca-certificates.crt
* CApath: /etc/ssl/certs
* TLSv1.3 (IN), TLS handshake, Server hello (2):
* TLSv1.3 (IN), TLS handshake, Encrypted Extensions (8):
* TLSv1.3 (IN), TLS handshake, Certificate (11):
* TLSv1.3 (IN), TLS handshake, CERT verify (15):
* TLSv1.3 (IN), TLS handshake, Finished (20):
* TLSv1.3 (OUT), TLS change cipher, Change cipher spec (1):
* TLSv1.3 (OUT), TLS handshake, Finished (20):
* SSL connection using TLSv1.3 / TLS_AES_256_GCM_SHA384 / X25519 / id-ecPublicKey
* ALPN: server accepted http/1.1
* Server certificate:
* subject: [NONE]
* start date: Aug 22 02:39:10 2026 GMT
* expire date: Aug 28 18:39:09 2026 GMT
* subjectAltName: host “2001:db8:1234:5678::100” matched cert’s IP address!
* issuer: C=US; O=Let’s Encrypt; CN=YE2
* SSL certificate verify ok.
* Certificate level 0: Public key type EC/prime256v1 (256/128 Bits/secBits), signed using ecdsa-with-SHA384
* Certificate level 1: Public key type EC/secp384r1 (384/192 Bits/secBits), signed using ecdsa-with-SHA384
* Certificate level 2: Public key type EC/secp384r1 (384/192 Bits/secBits), signed using ecdsa-with-SHA384
* Certificate level 3: Public key type EC/secp384r1 (384/192 Bits/secBits), signed using ecdsa-with-SHA384
* using HTTP/1.x
> GET / HTTP/1.1
> Host: [2001:db8:1234:5678::100]
> User-Agent: curl/8.5.0
> Accept: */*
>
* TLSv1.3 (IN), TLS handshake, Newsession Ticket (4):
* TLSv1.3 (IN), TLS handshake, Newsession Ticket (4):
* old SSL session ID is stale, removing
< HTTP/1.1 200 OK
< Server: nginx/1.28.3 (Ubuntu)
< Date: Sat, 22 Aug 2026 03:43:43 GMT
< Content-Type: text/html
< Transfer-Encoding: chunked
< Connection: keep-alive
<
<!doctype html>
<html>
<head>
<meta charset=”utf-8″>
<title>Let’s Encrypt IPv6 IP Certificate Test</title>
</head>
<body>
<h1>Let’s Encrypt IPv6 IP Certificate Test</h1>
<h2>Connection Information</h2>
<pre>
Protocol : https
Server Address : 2001:db8:1234:5678::100
Server Port : 443
TLS Protocol : TLSv1.3
TLS Cipher : TLS_AES_256_GCM_SHA384
</pre>
<h2>Client Information</h2>
<pre>
Client Address : 2001:db8:abcd:ef01::200
User Agent : curl/8.5.0
</pre>
</body>
</html>
* Connection #0 to host 2001:db8:1234:5678::100 left intact
ブラウザからもアクセスする。
https://[2001:db8:1234:5678::100]/
Production証明書なので、通常の公開Trust Storeから信頼される。
5.7 自動更新設定
Snap版Certbotには自動更新の仕組みが用意されている。
timerを確認する。
systemctl list-timers –all | grep -i certbot
systemctl status snap.certbot.renew.timer –no-pager
systemctl list-timers –all | grep -i certbot
Sat 2026-08-22 15:04:00 UTC 11h – – snap.certbot.renew.timer snap.certbot.renew.service
systemctl status snap.certbot.renew.timer –no-pager
● snap.certbot.renew.timer – Timer renew for snap application certbot.renew
Loaded: loaded (/etc/systemd/system/snap.certbot.renew.timer; enabled; preset: enabled)
Active: active (waiting) since Sat 2026-08-22 03:24:15 UTC; 21min ago
Invocation: b2f83cdaf82243109ba9e2f0ba0aea9a
Trigger: Sat 2026-08-22 15:04:00 UTC; 11h left
Triggers: ● snap.certbot.renew.service
Aug 22 03:24:15 le-ipv6-test-certbot systemd[1]: Started snap.certbot.renew.timer – Timer renew for snap application certbot.renew.
5.8 nginx reload
IPアドレス証明書ではCertbotのnginx installerを利用していないため、証明書更新後にnginxをreloadするdeploy hookを設定する。
deploy hookを作成する。
cat <<‘EOF’ > /etc/letsencrypt/renewal-hooks/deploy/reload-nginx
#!/bin/sh
# Reload nginx after successful certificate renewal.
systemctl reload nginx
EOF
chmod 755 /etc/letsencrypt/renewal-hooks/deploy/reload-nginx
確認する。
ls -l /etc/letsencrypt/renewal-hooks/deploy/
例えば、
total 0
-rwxr-xr-x 1 root root 87 Aug 22 03:48 reload-nginx
となればOKです。
構成としては原稿どおり、
Certbot Snap timer
|
v
certbot renew
|
+—-+—-+
| |
not due due
| |
skip renew
|
v
deploy hook
|
v
systemctl reload nginx
となります。
5.9 自動更新テスト
IPアドレス、
shortlived Profile、webrootによるrenewal設定が正しく保存されており、自動更新できることをdry-runで確認する。また、
--run-deploy-hooksを指定して、証明書更新後に設定したdeploy hookが実行されることも同時に確認する。certbot renew \
–dry-run \
–run-deploy-hooks
Saving debug log to /var/log/letsencrypt/letsencrypt.log
– – – – – – – – – – – – – – – – – – – – – – – – – – – – – – – – – – – – – – – –
Processing /etc/letsencrypt/renewal/2001:db8:1234:5678::100.conf
– – – – – – – – – – – – – – – – – – – – – – – – – – – – – – – – – – – – – – – –
Simulating renewal of an existing certificate for 2001:db8:1234:5678::100
– – – – – – – – – – – – – – – – – – – – – – – – – – – – – – – – – – – – – – – –
Congratulations, all simulated renewals succeeded:
/etc/letsencrypt/live/2001:db8:1234:5678::100/fullchain.pem (success)
– – – – – – – – – – – – – – – – – – – – – – – – – – – – – – – – – – – – – – – –
Congratulations, all simulated renewals succeededとなれば、更新処理のdry-runは成功している。deploy hookによってnginxがreloadされたことも確認する。
journalctl \
-u nginx \
–since “5 minutes ago” \
–no-pager
Saving debug log to /var/log/letsencrypt/letsencrypt.log
– – – – – – – – – – – – – – – – – – – – – – – – – – – – – – – – – – – – – – – –
Processing /etc/letsencrypt/renewal/2001:db8:1234:5678::100.conf
– – – – – – – – – – – – – – – – – – – – – – – – – – – – – – – – – – – – – – – –
Simulating renewal of an existing certificate for 2001:db8:1234:5678::100
– – – – – – – – – – – – – – – – – – – – – – – – – – – – – – – – – – – – – – – –
Congratulations, all simulated renewals succeeded:
/etc/letsencrypt/live/2001:db8:1234:5678::100/fullchain.pem (success)
– – – – – – – – – – – – – – – – – – – – – – – – – – – – – – – – – – – – – – – –
root@le-ipv6-test-certbot:~# ls -la /etc/letsencrypt/renewal/
total 12
drwxr-xr-x 2 root root 3 Aug 22 03:37 .
drwxr-xr-x 7 root root 7 Aug 22 03:49 ..
-rw-r–r– 1 root root 748 Aug 22 03:37 2001:db8:1234:5678::100.conf
root@le-ipv6-test-certbot:~# journalctl \
-u nginx \
–since “5 minutes ago” \
–no-pager
Aug 22 03:49:33 le-ipv6-test-certbot systemd[1]: Reloading nginx.service – A high performance web server and a reverse proxy server…
Aug 22 03:49:34 le-ipv6-test-certbot nginx[4983]: 2026/08/22 03:49:34 [warn] 4983#4983: duplicate MIME type “text/html” in /etc/nginx/sites-enabled/default:12
Aug 22 03:49:34 le-ipv6-test-certbot nginx[4983]: 2026/08/22 03:49:34 [warn] 4983#4983: duplicate MIME type “text/html” in /etc/nginx/sites-enabled/default:29
Aug 22 03:49:34 le-ipv6-test-certbot nginx[4983]: 2026/08/22 03:49:34 [notice] 4983#4983: signal process started
Aug 22 03:49:34 le-ipv6-test-certbot systemd[1]: Reloaded nginx.service – A high performance web server and a reverse proxy server.
必要に応じてdeploy hookを単体でも実行する。
/etc/letsencrypt/renewal-hooks/deploy/reload-nginx
echo $?
0
となれば正常。
5.10 renewal設定確認
Certbotが保存しているrenewal設定を確認する。
ls -la /etc/letsencrypt/renewal/
対象となるIPアドレス証明書の設定を確認する。
cat \
‘/etc/letsencrypt/renewal/2001:db8:1234:5678::100.conf’
webroot、Certificate Profile、IPv6アドレスなど、証明書の自動更新に必要な情報が保存されていることを確認する。
Snap Certbot版の最終構成
Internet
|
| IPv6
v
Firewall / Router
TCP 80 / 443
|
v
Ubuntu Server 26.04
|
Global IPv6
|
+————–+————–+
| |
nginx :80 nginx :443
| |
HTTP-01 TLS certificate
| |
+———–+ +———–+
v v
Certbot 5.7
|
| ACME
v
Let’s Encrypt
shortlived
|
160-hour cert
|
v
/etc/letsencrypt/live/
|
v
nginx
Certbot Snap timer
|
v
certbot renew
|
+——–+——–+
| |
not due due
| |
skip renew
|
v
deploy hook
|
v
nginx reload
6. APT版acme.shを利用する場合
6.1 acme.shをインストール
apt install -y acme.sh
acme.sh –version
6.2 Let’s Encrypt Stagingで取得
acme.sh –issue \
–server letsencrypt_test \
–certificate-profile shortlived \
-d ‘2001:db8:1234:5678::100’ \
-w /var/www/html \
–days 3
成功例:
[Sat Aug 22 03:57:01 UTC 2026] Using CA: https://acme-staging-v02.api.letsencrypt.org/directory
[Sat Aug 22 03:57:01 UTC 2026] Account key creation OK.
[Sat Aug 22 03:57:01 UTC 2026] Registering account: https://acme-staging-v02.api.letsencrypt.org/directory
[Sat Aug 22 03:57:02 UTC 2026] Registered
[Sat Aug 22 03:57:02 UTC 2026] ACCOUNT_THUMBPRINT=’FfU1tWeDSG-7MsbFQikpdrUKR7MZbB_G50LSiPvowhs’
[Sat Aug 22 03:57:02 UTC 2026] Creating domain key
[Sat Aug 22 03:57:02 UTC 2026] The domain key is here: /root/.acme.sh/2001:db8:1234:5678::100_ecc/2001:db8:1234:5678::100.key
[Sat Aug 22 03:57:02 UTC 2026] Single domain=’2001:db8:1234:5678::100′
[Sat Aug 22 03:57:03 UTC 2026] Getting webroot for domain=’2001:db8:1234:5678::100′
[Sat Aug 22 03:57:04 UTC 2026] Verifying: 2001:db8:1234:5678::100
[Sat Aug 22 03:57:04 UTC 2026] Pending. The CA is processing your order, please wait. (1/30)
[Sat Aug 22 03:57:08 UTC 2026] Success
[Sat Aug 22 03:57:08 UTC 2026] Verification finished, beginning signing.
[Sat Aug 22 03:57:08 UTC 2026] Let’s finalize the order.
[Sat Aug 22 03:57:08 UTC 2026] Le_OrderFinalize=’https://acme-staging-v02.api.letsencrypt.org/acme/finalize/328521664/46985384974′
[Sat Aug 22 03:57:08 UTC 2026] Order status is ‘processing’, let’s sleep and retry.
[Sat Aug 22 03:57:08 UTC 2026] Sleeping for 3 seconds then retrying
[Sat Aug 22 03:57:12 UTC 2026] Polling order status: https://acme-staging-v02.api.letsencrypt.org/acme/order/328521664/46985384974
[Sat Aug 22 03:57:13 UTC 2026] Downloading cert.
[Sat Aug 22 03:57:13 UTC 2026] Le_LinkCert=’https://acme-staging-v02.api.letsencrypt.org/acme/cert/2c1ce88ef9464a237de789899875ed7635cd’
[Sat Aug 22 03:57:13 UTC 2026] Cert success.
—–BEGIN CERTIFICATE—–
MIIDfDCCAwOgAwIBAgISLBzojvlGSiN954mJmHXtdjXNMAoGCCqGSM49BAMDMFEx
B+jT/tJxDunV9Qld4MP4pMtV89m+77oB6scGcA/KjNU=
—–END CERTIFICATE—–
[Sat Aug 22 03:57:13 UTC 2026] Your cert is in: /root/.acme.sh/2001:db8:1234:5678::100_ecc/2001:db8:1234:5678::100.cer
[Sat Aug 22 03:57:13 UTC 2026] Your cert key is in: /root/.acme.sh/2001:db8:1234:5678::100_ecc/2001:db8:1234:5678::100.key
[Sat Aug 22 03:57:13 UTC 2026] The intermediate CA cert is in: /root/.acme.sh/2001:db8:1234:5678::100_ecc/ca.cer
[Sat Aug 22 03:57:13 UTC 2026] And the full-chain cert is in: /root/.acme.sh/2001:db8:1234:5678::100_ecc/fullchain.cer
--days 3はLet’s Encryptが発行する証明書自体を3日間に変更する指定ではなく、acme.sh側の更新判定に使用する。実際の証明書有効期間はshortlived Profileによる160時間となる。証明書は以下の管理ディレクトリに作成される。
ls -la /root/.acme.sh/
drwxr-xr-x 2 root root 9 Aug 22 03:57 2001:db8:1234:5678::100_ecc
-rw-r–r– 1 root root 73 Aug 22 03:57 account.conf
drwxr-xr-x 3 root root 3 Aug 22 03:57 ca
-rw-r–r– 1 root root 629 Aug 22 03:57 http.header
証明書を確認する。
openssl x509 \
-in ‘/root/.acme.sh/2001:db8:1234:5678::100_ecc/2001:db8:1234:5678::100.cer’ \
-noout \
-issuer \
-dates \
-ext subjectAltName
例えば以下となれば成功。
issuer=C=US, O=Let’s Encrypt, CN=(STAGING) Artificial Amaranth YE1
notBefore=Aug 22 02:58:38 2026 GMT
notAfter=Aug 28 18:58:37 2026 GMT
X509v3 Subject Alternative Name: critical
IP Address:2001:db8:1234:5678::100
6.3 Let’s Encrypt Production証明書を取得
acme.sh –issue \
–server letsencrypt \
–certificate-profile shortlived \
-d ‘2001:db8:1234:5678::100’ \
-w /var/www/html \
–days 3 \
–force
[Sat Aug 22 03:58:06 UTC 2026] Using CA: https://acme-v02.api.letsencrypt.org/directory
[Sat Aug 22 03:58:06 UTC 2026] Account key creation OK.
[Sat Aug 22 03:58:06 UTC 2026] Registering account: https://acme-v02.api.letsencrypt.org/directory
[Sat Aug 22 03:58:07 UTC 2026] Registered
[Sat Aug 22 03:58:07 UTC 2026] ACCOUNT_THUMBPRINT=’68SDAPK-WJozpMy-daioNFLPz3jUShuWtbxandc3MR0′
[Sat Aug 22 03:58:07 UTC 2026] Single domain=’2001:db8:1234:5678::100′
[Sat Aug 22 03:58:08 UTC 2026] Getting webroot for domain=’2001:db8:1234:5678::100′
[Sat Aug 22 03:58:08 UTC 2026] Verifying: 2001:db8:1234:5678::100
[Sat Aug 22 03:58:09 UTC 2026] Pending. The CA is processing your order, please wait. (1/30)
[Sat Aug 22 03:58:12 UTC 2026] Success
[Sat Aug 22 03:58:12 UTC 2026] Verification finished, beginning signing.
[Sat Aug 22 03:58:12 UTC 2026] Let’s finalize the order.
[Sat Aug 22 03:58:12 UTC 2026] Le_OrderFinalize=’https://acme-v02.api.letsencrypt.org/acme/finalize/3654918671/547908443721′
[Sat Aug 22 03:58:13 UTC 2026] Downloading cert.
[Sat Aug 22 03:58:13 UTC 2026] Le_LinkCert=’https://acme-v02.api.letsencrypt.org/acme/cert/0676d76ae72f2bf9bf1ed5ca2efe6641daca’
[Sat Aug 22 03:58:14 UTC 2026] Cert success.
—–BEGIN CERTIFICATE—–
MIIDVjCCAtygAwIBAgISBnbXaucvK/m/HtXKLv5mQdrKMAoGCCqGSM49BAMDMDMx
gRby4CVSkR5IT/XAp/c3vEYhJNr3PNQ4veuwAN0MC2vCVWAqMd5Dzn6f
—–END CERTIFICATE—–
[Sat Aug 22 03:58:14 UTC 2026] Your cert is in: /root/.acme.sh/2001:db8:1234:5678::100_ecc/2001:db8:1234:5678::100.cer
[Sat Aug 22 03:58:14 UTC 2026] Your cert key is in: /root/.acme.sh/2001:db8:1234:5678::100_ecc/2001:db8:1234:5678::100.key
[Sat Aug 22 03:58:14 UTC 2026] The intermediate CA cert is in: /root/.acme.sh/2001:db8:1234:5678::100_ecc/ca.cer
[Sat Aug 22 03:58:14 UTC 2026] And the full-chain cert is in: /root/.acme.sh/2001:db8:1234:5678::100_ecc/fullchain.cer
証明書を確認する。
openssl x509 \
-in ‘/root/.acme.sh/2001:db8:1234:5678::100_ecc/2001:db8:1234:5678::100.cer’ \
-noout \
-issuer \
-dates \
-ext subjectAltName
Productionでは例えば以下となる。
issuer=C=US, O=Let’s Encrypt, CN=YE1
notBefore=Aug 22 02:59:43 2026 GMT
notAfter=Aug 28 18:59:42 2026 GMT
X509v3 Subject Alternative Name: critical
IP Address:2001:db8:1234:5678::100
6.4 nginx用ディレクトリへ証明書をインストール
acme.shの管理ディレクトリをnginxから直接参照せず、
--install-certを利用する。mkdir -p /etc/nginx/ssl/le-ipv6-test
acme.sh –install-cert \
-d ‘2001:db8:1234:5678::100’ \
–ecc \
–key-file /etc/nginx/ssl/le-ipv6-test/privkey.pem \
–fullchain-file /etc/nginx/ssl/le-ipv6-test/fullchain.pem \
–reloadcmd ‘systemctl reload nginx’
[Sat Aug 22 03:59:23 UTC 2026] Installing key to: /etc/nginx/ssl/le-ipv6-test/privkey.pem
[Sat Aug 22 03:59:24 UTC 2026] Installing full chain to: /etc/nginx/ssl/le-ipv6-test/fullchain.pem
[Sat Aug 22 03:59:24 UTC 2026] Running reload cmd: systemctl reload nginx
[Sat Aug 22 03:59:24 UTC 2026] Reload successful
6.5 nginx HTTPS設定
cat <<‘EOF’ >> /etc/nginx/sites-available/default
server {
listen 443 ssl;
listen [::]:443 ssl;
ssl_certificate /etc/nginx/ssl/le-ipv6-test/fullchain.pem;
ssl_certificate_key /etc/nginx/ssl/le-ipv6-test/privkey.pem;
root /var/www/html;
index index.shtml index.html;
location / {
ssi on;
try_files $uri $uri/ =404;
}
}
EOF
確認する。
nginx -t
systemctl reload nginx
待受確認:
ss -lntp | grep ‘:443’
6.6 HTTPS確認
curl -6 -v \
‘https://[2001:db8:1234:5678::100]/’
以下のようにSANとの一致と証明書検証成功を確認する。
subjectAltName: host “2001:…” matched cert’s IP address!
SSL certificate verify ok.
‘https://[2001:db8:1234:5678::100]/’
* Trying [2001:db8:1234:5678::100]:443…
* Connected to 2001:db8:1234:5678::100 (2001:db8:1234:5678::100) port 443
* ALPN: curl offers h2,http/1.1
* TLSv1.3 (OUT), TLS handshake, Client hello (1):
* CAfile: /etc/ssl/certs/ca-certificates.crt
* CApath: /etc/ssl/certs
* TLSv1.3 (IN), TLS handshake, Server hello (2):
* TLSv1.3 (IN), TLS handshake, Encrypted Extensions (8):
* TLSv1.3 (IN), TLS handshake, Certificate (11):
* TLSv1.3 (IN), TLS handshake, CERT verify (15):
* TLSv1.3 (IN), TLS handshake, Finished (20):
* TLSv1.3 (OUT), TLS change cipher, Change cipher spec (1):
* TLSv1.3 (OUT), TLS handshake, Finished (20):
* SSL connection using TLSv1.3 / TLS_AES_256_GCM_SHA384 / X25519 / id-ecPublicKey
* ALPN: server accepted http/1.1
* Server certificate:
* subject: [NONE]
* start date: Aug 22 02:59:43 2026 GMT
* expire date: Aug 28 18:59:42 2026 GMT
* subjectAltName: host “2001:db8:1234:5678::100” matched cert’s IP address!
* issuer: C=US; O=Let’s Encrypt; CN=YE1
* SSL certificate verify ok.
* Certificate level 0: Public key type EC/prime256v1 (256/128 Bits/secBits), signed using ecdsa-with-SHA384
* Certificate level 1: Public key type EC/secp384r1 (384/192 Bits/secBits), signed using ecdsa-with-SHA384
* Certificate level 2: Public key type EC/secp384r1 (384/192 Bits/secBits), signed using ecdsa-with-SHA384
* Certificate level 3: Public key type EC/secp384r1 (384/192 Bits/secBits), signed using ecdsa-with-SHA384
* using HTTP/1.x
> GET / HTTP/1.1
> Host: [2001:db8:1234:5678::100]
> User-Agent: curl/8.5.0
> Accept: */*
>
* TLSv1.3 (IN), TLS handshake, Newsession Ticket (4):
* TLSv1.3 (IN), TLS handshake, Newsession Ticket (4):
* old SSL session ID is stale, removing
< HTTP/1.1 403 Forbidden
< Server: nginx/1.28.3 (Ubuntu)
< Date: Sat, 22 Aug 2026 04:03:15 GMT
< Content-Type: text/html
< Content-Length: 162
< Connection: keep-alive
<
<html>
<head><title>403 Forbidden</title></head>
<body>
<center><h1>403 Forbidden</h1></center>
<hr><center>nginx/1.28.3 (Ubuntu)</center>
</body>
</html>
* Connection #0 to host 2001:db8:1234:5678::100 left intact
6.7 自動更新設定
acme.sh 3.1.4以降ではACME Renewal Information(ARI, RFC 9773)に対応し、CAが提示するrenewal windowを利用する方式がデフォルトで有効になっている。一方、Ubuntu 26.04標準APT版はacme.sh 3.1.2のため、この機能は利用できない。
一方、Ubuntu 26.04標準APT版acme.sh 3.1.2では注意が必要となる。
通常の、
acme.sh –cron
は今回使用しない。
実機で確認したところ、3.1.2ではcronによる証明書探索が、
/root/.acme.sh/*.*/
となっている。
例えば、
example.com_ecc/
には
.が含まれるため一致する。一方、
2001:db8:1234:5678::100_ecc/
には
.がないため一致しない。そのため、IPv6証明書を明示的に指定してrenewする。
acme.sh –renew \
-d ‘2001:db8:1234:5678::100’ \
–ecc
更新時期前なら、
[Sat Aug 22 04:05:22 UTC 2026] Renewing: ‘2001:db8:1234:5678::100’
[Sat Aug 22 04:05:22 UTC 2026] Renewing using Le_API=https://acme-v02.api.letsencrypt.org/directory
[Sat Aug 22 04:05:22 UTC 2026] Skipping. Next renewal time is: 2026-08-24T03:58:14Z
[Sat Aug 22 04:05:22 UTC 2026] Add ‘–force’ to force renewal.
となれば正常。
6.8 systemd service作成
cat <<‘EOF’ > /etc/systemd/system/acme-renew.service
[Unit]
Description=Renew Let’s Encrypt IPv6 IP certificate
Wants=network-online.target
After=network-online.target nginx.service
[Service]
Type=oneshot
ExecStart=/usr/bin/acme.sh –renew –home /root/.acme.sh -d 2001:db8:1234:5678::100 –ecc
SuccessExitStatus=2
EOF
SuccessExitStatus=2が重要。acme.sh 3.1.2では更新不要の場合、
Skipping. Next renewal time is: …
と正常にskipしてもexit code 2を返す。
これをsystemdで正常終了として扱う。
6.9 systemd timer作成
6時間ごとに確認する。
cat <<‘EOF’ > /etc/systemd/system/acme-renew.timer
[Unit]
Description=Check ACME certificate renewal
[Timer]
OnBootSec=10min
OnUnitActiveSec=6h
Persistent=true
[Install]
WantedBy=timers.target
EOF
有効化する。
systemctl daemon-reload
systemctl enable –now acme-renew.timer
確認する。
systemctl status acme-renew.timer –no-pager
systemctl list-timers acme-renew.timer
systemctl status acme-renew.timer –no-pager
● acme-renew.timer – Check ACME certificate renewal
Loaded: loaded (/etc/systemd/system/acme-renew.timer; enabled; preset: enabled)
Active: active (waiting) since Sat 2026-08-22 04:07:26 UTC; 8s ago
Invocation: 176ee14ed1aa4b8689002bea9912a4ad
Trigger: Sat 2026-08-22 10:07:26 UTC; 5h 59min left
Triggers: ● acme-renew.service
Aug 22 04:07:26 le-ipv6-test-acme systemd[1]: Started acme-renew.timer – Check ACME certificate renewal.
systemctl list-timers acme-renew.timer
NEXT LEFT LAST PASSED UNIT ACTIVATES
Sat 2026-08-22 10:07:26 UTC 5h 59min Sat 2026-08-22 04:07:26 UTC 12s ago acme-renew.timer acme-renew.service
1 timers listed.
Pass –all to see loaded but inactive timers, too.
6.10 自動更新テスト
systemctl start acme-renew.service
確認する。
systemctl status acme-renew.service –no-pager
journalctl \
-u acme-renew.service \
-n 30 \
–no-pager
更新時期前なら以下のようになれば正常。
Renewing: ‘2001:…’
Renewing using Le_API=https://acme-v02.api.letsencrypt.org/directory
Skipping. Next renewal time is: …
…
Deactivated successfully.
Finished acme-renew.service
○ acme-renew.service – Renew Let’s Encrypt IPv6 IP certificate
Loaded: loaded (/etc/systemd/system/acme-renew.service; static)
Drop-In: /run/systemd/system/service.d
└─zzz-lxc-service.conf
Active: inactive (dead) since Sat 2026-08-22 04:08:07 UTC; 5s ago
Invocation: faa7c26f93f24f53a572d6007866c651
TriggeredBy: ● acme-renew.timer
Process: 4981 ExecStart=/usr/bin/acme.sh –renew –home /root/.acme.sh -d 2001:db8:1234:5678::100 –ecc (code=exited, status=2)
Main PID: 4981 (code=exited, status=2)
Mem peak: 9.6M
CPU: 105ms
Aug 22 04:08:07 le-ipv6-test-acme systemd[1]: Starting acme-renew.service – Renew Let’s Encrypt IPv6 IP certificate…
Aug 22 04:08:07 le-ipv6-test-acme acme.sh[4981]: [Sat Aug 22 04:08:07 AM UTC 2026] Renewing: ‘2001:db8:1234:5678::100’
Aug 22 04:08:07 le-ipv6-test-acme acme.sh[4981]: [Sat Aug 22 04:08:07 AM UTC 2026] Renewing using Le_API=https://acme-v02.api.letsencrypt.org/directory
Aug 22 04:08:07 le-ipv6-test-acme acme.sh[4981]: [Sat Aug 22 04:08:07 AM UTC 2026] Skipping. Next renewal time is: 2026-08-24T03:58:14Z
Aug 22 04:08:07 le-ipv6-test-acme acme.sh[4981]: [Sat Aug 22 04:08:07 AM UTC 2026] Add ‘–force’ to force renewal.
Aug 22 04:08:07 le-ipv6-test-acme systemd[1]: acme-renew.service: Deactivated successfully.
Aug 22 04:08:07 le-ipv6-test-acme systemd[1]: Finished acme-renew.service – Renew Let’s Encrypt IPv6 IP certificate.
Aug 22 04:07:26 le-ipv6-test-acme systemd[1]: Starting acme-renew.service – Renew Let’s Encrypt IPv6 IP certificate…
Aug 22 04:07:26 le-ipv6-test-acme acme.sh[4913]: [Sat Aug 22 04:07:26 AM UTC 2026] Renewing: ‘2001:db8:1234:5678::100’
Aug 22 04:07:26 le-ipv6-test-acme acme.sh[4913]: [Sat Aug 22 04:07:26 AM UTC 2026] Renewing using Le_API=https://acme-v02.api.letsencrypt.org/directory
Aug 22 04:07:26 le-ipv6-test-acme acme.sh[4913]: [Sat Aug 22 04:07:26 AM UTC 2026] Skipping. Next renewal time is: 2026-08-24T03:58:14Z
Aug 22 04:07:26 le-ipv6-test-acme acme.sh[4913]: [Sat Aug 22 04:07:26 AM UTC 2026] Add ‘–force’ to force renewal.
Aug 22 04:07:26 le-ipv6-test-acme systemd[1]: acme-renew.service: Deactivated successfully.
Aug 22 04:07:26 le-ipv6-test-acme systemd[1]: Finished acme-renew.service – Renew Let’s Encrypt IPv6 IP certificate.
Aug 22 04:08:07 le-ipv6-test-acme systemd[1]: Starting acme-renew.service – Renew Let’s Encrypt IPv6 IP certificate…
Aug 22 04:08:07 le-ipv6-test-acme acme.sh[4981]: [Sat Aug 22 04:08:07 AM UTC 2026] Renewing: ‘2001:db8:1234:5678::100’
Aug 22 04:08:07 le-ipv6-test-acme acme.sh[4981]: [Sat Aug 22 04:08:07 AM UTC 2026] Renewing using Le_API=https://acme-v02.api.letsencrypt.org/directory
Aug 22 04:08:07 le-ipv6-test-acme acme.sh[4981]: [Sat Aug 22 04:08:07 AM UTC 2026] Skipping. Next renewal time is: 2026-08-24T03:58:14Z
Aug 22 04:08:07 le-ipv6-test-acme acme.sh[4981]: [Sat Aug 22 04:08:07 AM UTC 2026] Add ‘–force’ to force renewal.
Aug 22 04:08:07 le-ipv6-test-acme systemd[1]: acme-renew.service: Deactivated successfully.
Aug 22 04:08:07 le-ipv6-test-acme systemd[1]: Finished acme-renew.service – Renew Let’s Encrypt IPv6 IP certificate.
6.11 renewal設定確認
grep -E \
‘Le_Domain|Le_Webroot|Le_API|Le_Certificate_Profile|Le_RenewalDays|Le_NextRenewTimeStr|Le_RealKeyPath|Le_RealFullChainPath|Le_ReloadCmd’ \
‘/root/.acme.sh/2001:db8:1234:5678::100_ecc/2001:db8:1234:5678::100.conf’
概ね以下ならOK。
Le_Domain=’2001:db8:1234:5678::100′
Le_Webroot=’/var/www/html’
Le_Certificate_Profile=’shortlived’
Le_API=’https://acme-v02.api.letsencrypt.org/directory’
Le_RenewalDays=’3′
Le_NextRenewTimeStr=’2026-08-24T03:58:14Z’
Le_RealKeyPath=’/etc/nginx/ssl/le-ipv6-test/privkey.pem’
Le_ReloadCmd=’__ACME_BASE64__START_c3lzdGVtY3RsIHJlbG9hZCBuZ2lueA==__ACME_BASE64__END_’
Le_RealFullChainPath=’/etc/nginx/ssl/le-ipv6-test/fullchain.pem’
APT acme.sh版の最終構成
Internet
|
| IPv6
v
Firewall / Router
TCP 80 / 443
|
v
Ubuntu Server 26.04
|
Global IPv6 Address
|
+————–+————–+
| |
nginx :80 nginx :443
| |
HTTP-01 TLS certificate
| |
+———–+ +———–+
v v
acme.sh 3.1.2
|
| ACME
v
Let’s Encrypt
shortlived
|
160-hour cert
|
v
/etc/nginx/ssl/…
|
v
nginx reload
systemd timer
|
every 6h
|
v
acme.sh –renew
|
+——–+——–+
| |
not due due
| |
skip renew
|
v
nginx reload
7. Snap CertbotとAPT acme.shの違い
|
項目
|
Snap Certbot
|
APT acme.sh
|
|---|---|---|
|
証明書管理
|
/etc/letsencrypt/ |
/root/.acme.sh/ |
|
nginx用コピー
|
不要
|
--install-cert |
|
nginx IP installer
|
×
|
installer方式ではない
|
|
nginx設定
|
手動
|
手動
|
|
更新スケジュール
|
Snap側で用意
|
今回はsystemd timerを自作
|
|
更新コマンド
|
certbot renew |
acme.sh
--renew -d IPv6 --ecc |
|
nginx reload
|
deploy hook
|
--reloadcmd |
|
IPv6固有のcron問題
|
なし
|
Ubuntu版3.1.2では対策が必要
|
Ubuntu 26.04でLet’s EncryptのIPアドレス証明書を利用する場合、Snap版Certbotを第一候補とし、Snapを追加したくない場合やAPTだけで構成したい場合はacme.shを利用する構成が分かりやすい。
8. クライアントからの確認
ブラウザから確認
Production証明書を設定した状態で、ブラウザから以下へアクセスする。
通常の公開CA証明書として認識され、証明書警告なしでアクセスできることを確認する。
https://[2001:db8:1234:5678::100]/
Chromeでみると

ではなくて

という感じでIPアドレスでもhttps接続
Safariでの証明書情報
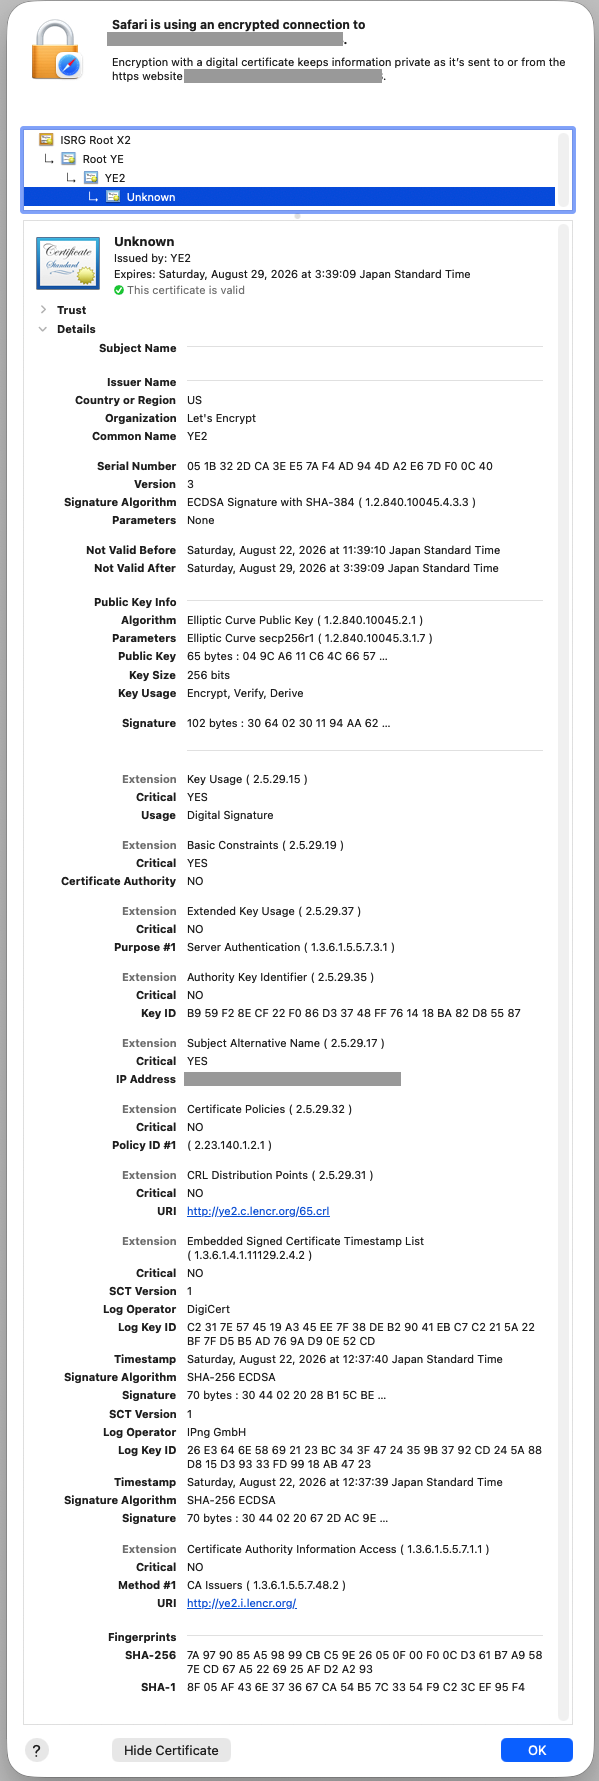
-
接続先が グレーでマスクしてあるのが生のIPv6アドレス
-
チェーンが
ISRG Root X2 → Root YE → YE2 → Unknown -
Issuer が Let’s Encrypt / YE2
-
SAN が
IP Address:グレーでマスク -
This certificate is valid -
Not Valid Before: Aug 22 -
Not Valid After: Aug 29 -
CTのSCTまで入っている
そして
Unknown がまた面白い。これは怪しい証明書だからUnknownなのではなく、Subject Nameに人間向けのCN/FQDNがないIP Address Certificateだから、Safariが表示名を付けられずUnknownとしていると見るのが自然です。実際、本人確認の対象は下にあるSANの
Subject Alternative Name
Critical YES
IP Address グレーでマスク
です。
curlから確認
別のIPv6ネットワーク上にあるUbuntu Serverから確認した。
curl -6 -v \
‘https://[2001:db8:1234:5678::100]/’
確認できた主な部分:
* SSL connection using TLSv1.3 / TLS_AES_256_GCM_SHA384 / X25519 / id-ecPublicKey
* Server certificate:
* subject: [NONE]
* start date: Aug 20 19:18:32 2026 GMT
* expire date: Aug 27 11:18:31 2026 GMT
* subjectAltName: host “2001:db8:1234:5678::100” matched cert’s IP address!
* issuer: C=US; O=Let’s Encrypt; CN=YE1
* SSL certificate verify ok.
さらに、
< HTTP/1.1 200 OK
< Server: nginx/1.28.3 (Ubuntu)
が返っている。
これにより以下を確認できた。
-
外部IPv6ネットワークからTCP/443へ到達できる
-
TLS 1.3で接続できる
-
接続先IPv6アドレスと証明書SANのIP Addressが一致している
-
Let’s Encryptの証明書チェーンが通常のCAストアで検証できる
-
HTTPSサービスとしてHTTP 200を返している
subject: [NONE]は異常ではない。今回重要なのはCNではなくSANに登録されたIP Addressである。
subjectAltName: host “2001:…” matched cert’s IP address!
curlでは-k(--insecure)を使用していないため、OS標準のCAストアによる証明書検証にも成功している。9. 今回実証できたこと
Ubuntu 26.04では、Snap版CertbotまたはUbuntu標準APT版acme.shを使用することで、
DNS名なし
|
v
IPv6アドレスを直接指定
|
v
Let’s Encrypt
shortlived Certificate
|
v
160時間の公開CA証明書
|
v
nginx HTTPS
|
v
自動更新
まで構成できる。
また、acme.shを利用する場合はUbuntu 26.04の標準APTパッケージだけでも構成できる。
Snap版Certbot 5.7.0では、StagingからProductionへの切り替え、IPアドレス証明書の取得、nginxへの設定、自動更新のdry-run、deploy hookによるnginx reloadまで実機で確認した。
APT版acme.sh 3.1.2でも、Staging/Production証明書の取得、nginxへの配置、明示的なrenewとsystemd timerによる自動更新まで実機で確認した。
で採用したのか?どこかに? うーん、見当たらない。。。
Lineのエンドポイントで使えたらいいなくらいw
追記:
[参考]FQDNとIPアドレスの両方を入れる場合
1枚の証明書のSANに、FQDNとIPアドレスの両方を含めることもできる。
FQDNとIPアドレスの両方をSANに含めた場合、接続時に両方が一致する必要はない。FQDNでアクセスした場合はDNS Identifier、IPアドレスで直接アクセスした場合はIP Address Identifierと照合され、アクセス時に使用したIdentifierがSANのいずれかと一致すれば証明書の名前検証は成立する。
SAN
|
+– DNS:server.example.com
|
+– IP Address:2001:db8:…::100
↑
|
アクセス時に使用したIdentifierが
どれか一つと一致すればよい
IPアドレスを含むため、Let’s Encryptの
shortlived Profileを使用し、証明書の有効期間は160時間となる。Certbotの場合:
certbot certonly \
–preferred-profile shortlived \
–webroot \
–webroot-path /var/www/html \
-d ‘server.example.com’ \
–ip-address ‘2001:db8:1234:5678::100’
acme.shの場合:
acme.sh –issue \
–server letsencrypt \
–certificate-profile shortlived \
-d ‘server.example.com’ \
-d ‘2001:db8:1234:5678::100’ \
-w /var/www/html \
–days 3
発行された証明書のSANは、概ね以下のようになる。
X509v3 Subject Alternative Name:
DNS:server.example.com, IP Address:2001:db8:1234:5678::100
これなら、
https://server.example.com/
https://[2001:db8:1234:5678::100]/
のどちらでも証明書のIdentifierが一致する。
重要なのは、FQDNからそのIPv6アドレスが名前解決できるから両方が証明されるのではなく、SANに
DNSとIP Addressという別々のIdentifierが登録されているから両方で利用できる、という点。たとえばサーバが固定Global IPv6を持つなら、
SAN:
DNS:server.example.com
IP Address:2001:db8:1234:5678::100
としておけば、
通常利用
https://server.example.com/
↓
DNS SANで検証
DNS障害・検証・管理経路
https://[2001:db8:1234:5678::100]/
↓
IP SANで検証
とすることができる。
これ、特に管理系インフラでは結構いい。DNSが死んだときにIP直打ちしても、
curl -k https://[IPv6]/
に逃げなくて済む。しかし、この状態だと、いわば、
「DNSが死んだときの非常口にはなるけど、非常口のドアに40桁くらいの暗証番号が書いてある感じ」
は、否めない。
デフォルト化するなら、最大の欠点はやはりIPアドレスがIdentityに固定されること。prefix変更、ISP変更、クラウドのアドレス変更などがあると、その証明書は再発行が必要になる。
とはいえACMEで全部自動化しているなら、
IP変更
↓
新IP検出
↓
DNS更新
↓
DNS + 新IPで証明書再取得
↓
サービスreload
まで自動化すればいい。
そう考えると、今回の記事の「IP証明書なんて誰が使うんだ」から一周して、**「固定IPv6を持つ管理サーバならFQDN証明書にIPv6 SANも入れておくの、意外と便利じゃね?」**に戻ってくる(笑)。